
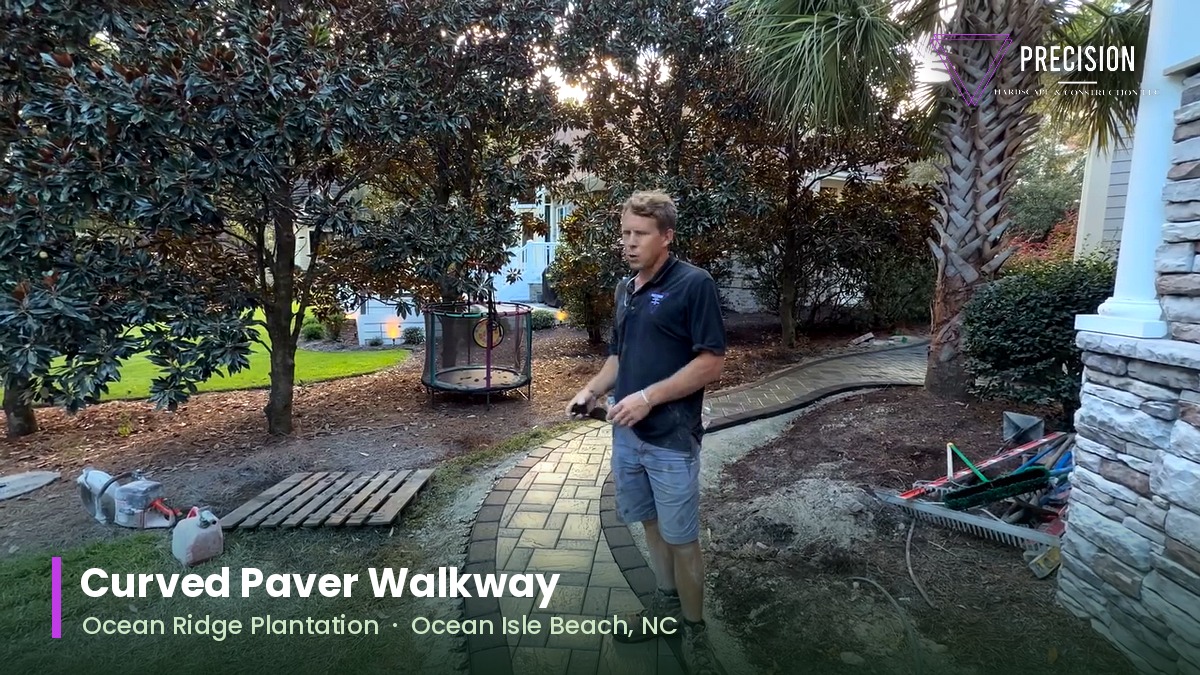
Almost nobody asks a contractor for a curved walkway. What they ask for is a path from the patio to the driveway, and they picture a straight one, because a straight one is what most of us have seen our whole lives. Then the walkway goes in with a gentle flare and three easy turns, and the same homeowner stands at the back door looking at it and says some version of the same thing: I didn’t know you could do that.
A curve is the difference between a path that serves a yard and a path that belongs to it. It is also, quietly, one of the more demanding things to build well in this trade. What follows is how a curve actually gets laid out, marked, cut and held in place, using an eighty-foot walkway we built at Ocean Ridge Plantation in Ocean Isle Beach as the example.
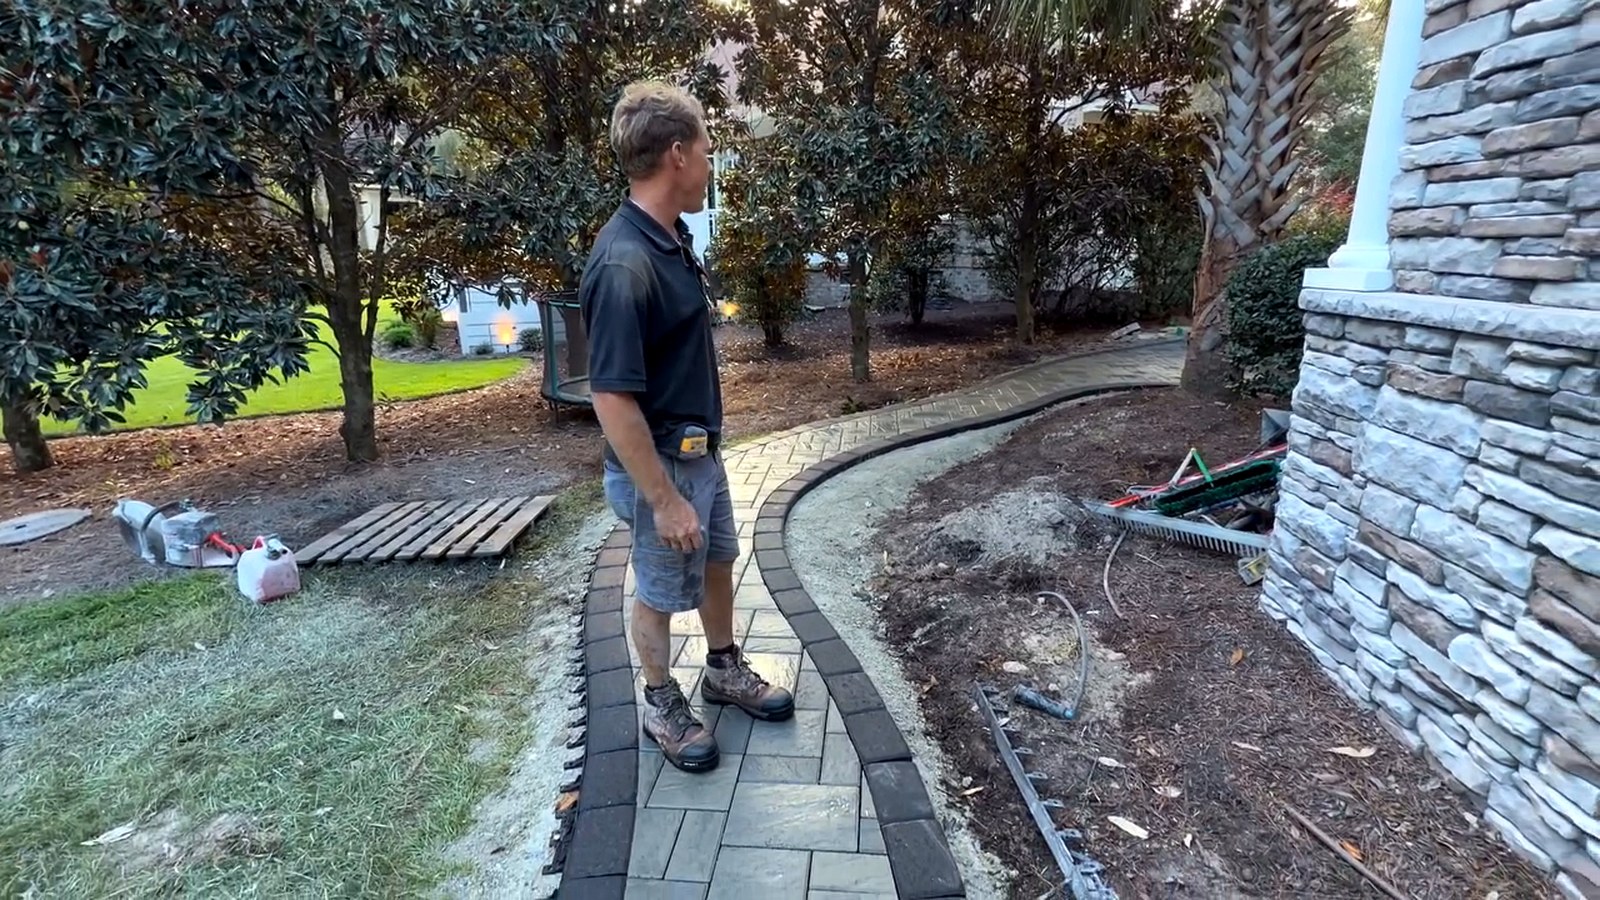
Matt Jones walks the walkway flare by flare and shows how each curve gets set before anything is cut.
What’s In This Article
- Why a Walkway Curves at All
- A Curve Gets Walked Before It Gets Marked
- The Anatomy of This Particular Walkway
- Copying the Curve on the Other Side
- Landing a Curve on Steps, a Landing or a Driveway
- Cutting to the Line, and Why the Border Is the Payoff
- What Holds a Curve in Place for Twenty Years
- Curves Around Things That Won’t Move
- Photos From the Walkway
- What a Curve Actually Costs You
- The Last Day Is the One Nobody Films
- Frequently Asked Questions
Why a Walkway Curves at All
There is a practical answer and there is an honest one, and they are both worth hearing before you decide what you want in your own yard.
The practical answer is that yards are rarely as simple as the plan suggests. Between the back patio and the top of the driveway on this property there are magnolias with established root systems, planting beds that the homeowners have spent years filling in, a slope that falls gently toward one corner, and a palm that nobody was going to remove for the sake of a straight line. A curve lets a path move through all of that rather than bulldoze a corridor through the middle of it. It keeps the walkway out of tree roots, which protects both the tree and the walkway, and it lets the path follow the natural fall of the ground instead of fighting it, which matters a great deal when the ground is coastal sand and the rain arrives four inches at a time.
The honest answer is that curves look better, and looking better is a legitimate reason to spend money on your own home. A straight run of pavers between two fixed points reads as infrastructure. Your eye takes it in all at once, follows it from end to end in a second, and files it away as a thing you walk on. A path that bends does something different. It hides its own destination, so the yard reveals itself gradually as you walk, and the house appears from a slightly different angle each time you come around a turn. Landscape designers have understood this for a few hundred years. It is why almost no garden worth visiting is laid out on a grid.
There is a third reason that comes up often in conversation with homeowners in Ocean Isle Beach, Sunset Beach and Calabash, which is that a curve makes a yard feel bigger. A straight path tells you exactly how far it is from here to there. A curved one refuses to answer the question, and the space reads as larger and more considered than the same square footage laid out in rectangles. That is not a trick so much as a fact about how people perceive distance, and it costs nothing extra in materials to take advantage of it.
A Curve Gets Walked Before It Gets Marked
The single most important thing to understand about curve layout is that it does not happen on paper. It happens on the ground, on foot, usually more than once, and often at two different times of day.
The tool for it is not sophisticated. A garden hose, a length of flexible pipe, a rope — anything that will lie on the ground and hold a smooth shape without kinking. You lay it roughly where the path wants to go, then you stand back and look at it, then you move it, and you keep doing that until it reads right. In the video you can see the hose still lying alongside the work while the crew lays pavers, because on a walkway this long the line gets adjusted more than once before anyone commits to it.
What makes this harder than it sounds is that a curve does not look the same from every angle. A line that flows beautifully when you are standing on the patio looking down the yard can look awkward and lopsided from the driveway looking back, and it can look like nothing at all from the kitchen window, which is where the homeowner will actually see it most often. So the line gets checked from every one of those positions. If it only works from one of them, it is the wrong line, and moving a hose costs nothing while moving a laid walkway costs a week.
There is also a rhythm to a curve that has to be got right. Curves that change radius too often look nervous, as though the path could not decide where it was going. Curves that are too gentle disappear entirely and you end up with an expensive walkway that reads as a slightly wobbly straight line, which is the worst of both worlds. What you are aiming for is a small number of confident, unhurried moves, each one with a reason behind it — a bed to swing around, a tree to clear, a view to open up.
Once the line is right, it gets marked with paint, and from that moment the paint is the authority. Everything downstream — the excavation, the base, the edge restraint, every cut — follows that line. Which is precisely why it is worth spending an extra half hour with a hose before anyone picks up a shovel.
The Anatomy of This Particular Walkway
In the video, Matt walks the length of the run and names each move as he comes to it, and it is worth following along because it shows how a curve is actually composed rather than simply drawn.
It begins with a flare coming off the patio. Where a walkway meets a larger paved area, a square junction looks abrupt — the path appears to have been stuck onto the patio as an afterthought. Widening the mouth of the walkway where it leaves the patio solves that. The two surfaces read as one piece of work, and there is a practical benefit as well, because the wider opening gives people somewhere to step aside and pass each other at the busiest point on the whole run.
From there the path takes a real subtle curve, then flares out a little ways. This is the part that most distinguishes a designed path from a merely bent one. The opening move is deliberately understated. You are not announcing the curve, you are easing into it, so that by the time the walkway commits to a direction it feels as though it was always heading that way.
Then the walkway continues on pretty consistent through the middle section. This matters more than it sounds. A long path needs somewhere for the eye to rest, and a stretch of steady, unchanging line does that job. Curving continuously for eighty feet would be exhausting to look at and considerably worse to walk.
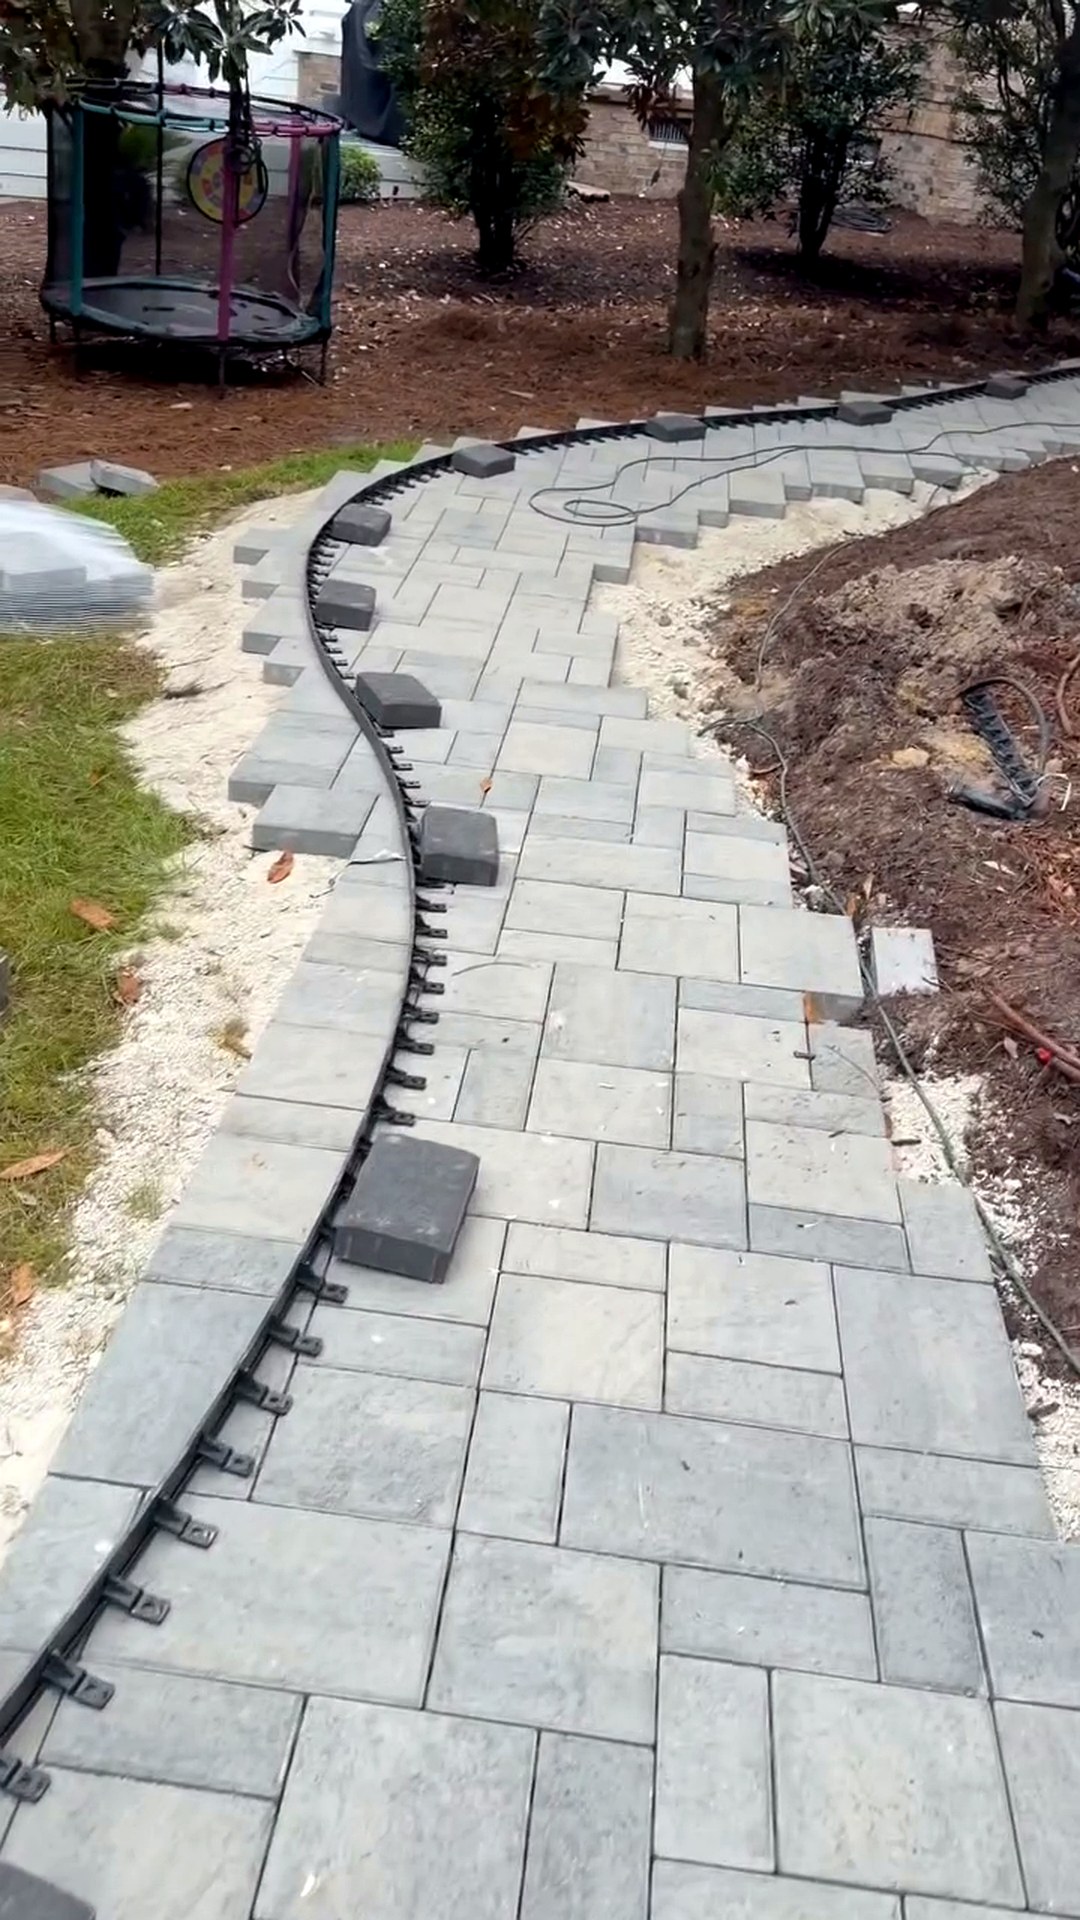
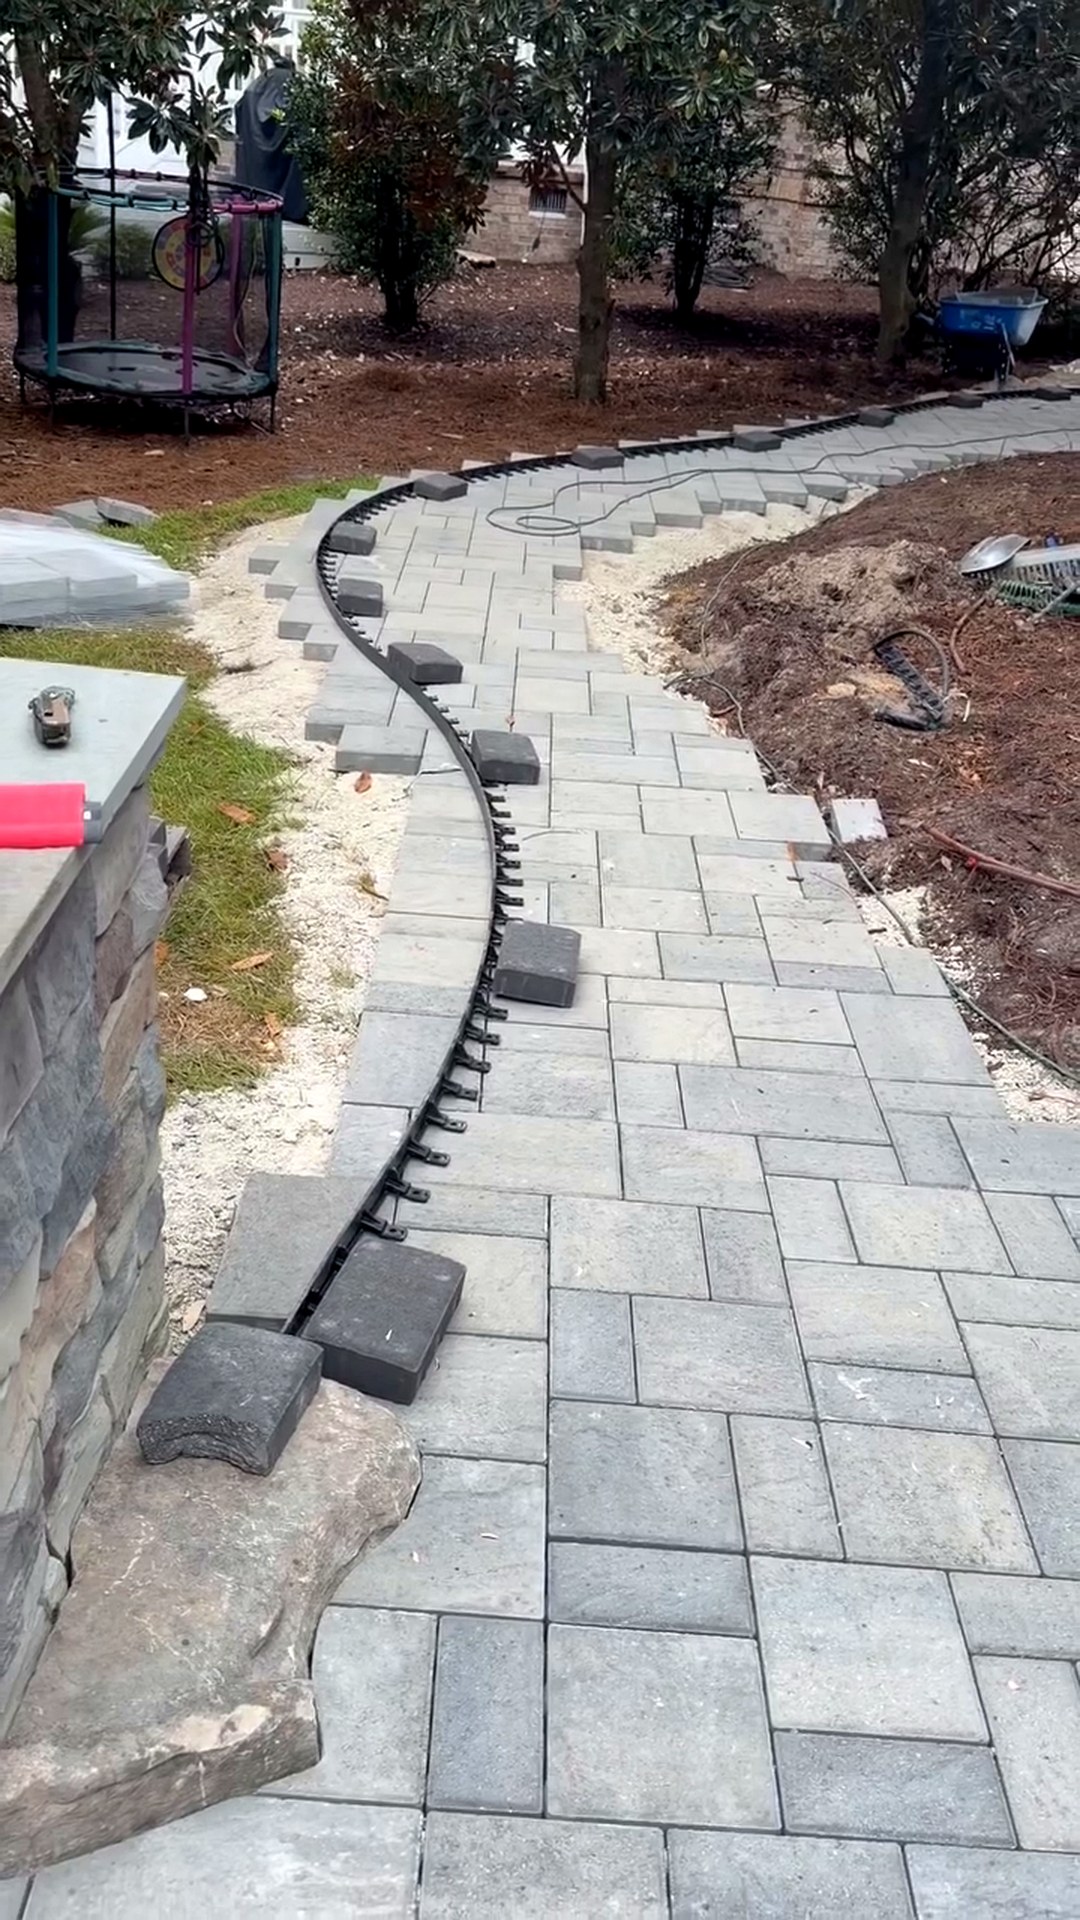
And then, as Matt puts it, a little turn in it, another turn in it, another turn in it. Three turns through the back half of the run, each one responding to something real on the ground. This is the sequence you can see in the photographs below, with the black edge restraint following the line like a drawn stroke before a single border paver has gone down.
Four movements, then, across eighty feet: flare, ease, settle, turn. Almost nobody walking that path will ever break it down that way. They will simply find that it is pleasant to walk, which is the entire point.
Copying the Curve on the Other Side
Here is the part of curve work that homeowners almost never think about, and that separates a walkway that looks right from one that looks slightly wrong in a way nobody can name.
A walkway has two edges. Everything described so far concerns the first one. The second edge has to hold a consistent width from the first along the entire run, and that is a genuinely difficult geometric problem, because an offset curve is not the same curve moved sideways. On the inside of a bend the second edge has a tighter radius than the first; on the outside it has a looser one. If you simply set the second line by eye, the path will pinch on some bends and bloat on others, and although most people could not tell you why, the walkway will read as amateur.
Matt describes the process plainly in the video: once the rest of the walkway is laid, we’re gonna copy the curve on the other side. In practice that means measuring the offset perpendicular to the first line at frequent intervals along its length, marking those points, and then fairing a smooth line through them — checking as you go that the new line has no flat spots or sudden tightenings, because a mathematically correct offset can still look wrong if the original had any unevenness in it. The first line gets the aesthetic judgment. The second line gets the discipline.
The tighter the bend, the less forgiving this becomes, which is one of several reasons an experienced crew keeps radii generous unless there is a compelling reason not to. A sweeping curve is easier to build accurately, easier to walk, easier to hold in place over time, and better looking than a tight one. Tight radii belong in a walkway only where something genuinely immovable demands them.
Landing a Curve on Steps, a Landing or a Driveway
A curve has to end somewhere, and where it ends is usually the fussiest problem on the job. On this property the walkway runs out to the top of the driveway, where a landing and steps were going in, and as Matt notes, we’re gonna have to add another curve so it ties into the steps there where the landing is going.
That extra curve is doing more work than it appears. A landing and a set of steps are rigid, rectangular, fixed objects. A walkway arriving at them off-axis looks like a mistake, and worse, it forces people to change direction awkwardly at exactly the point where they are also changing elevation — which is the least welcome place in any yard to ask somebody to think about their feet. The final curve turns the path so that it meets the landing square, and it does so far enough back that the turn is finished before the steps begin.
There are three things being solved simultaneously at that junction. The alignment has to be square, so people walk onto the landing rather than across it. The elevation has to match, so there is no lip to catch a toe and no step that is a different height from the others. And the water has to keep moving, because a walkway that meets a driveway at a slight uphill creates a dam, and the first heavy coastal rain will show you exactly where that dam is. Getting all three right at the same point is a large share of the skill in this trade.
We go into the driveway side of that junction in more detail in our article on driveway extensions and paver walkways, and into the step and landing side in paver landings and steps.
Cutting to the Line, and Why the Border Is the Payoff
Up to this point the curve exists as paint, edge restraint and intention. Turning it into stone is where the hours go.
The field of the walkway gets laid straight through the curve, running past the marked line on both sides with pavers deliberately left long. Only then does the cutting begin, following the line with a saw, one paver at a time, each cut at a slightly different angle from the one before it because the line is always turning. On a run of this length that is several hundred individual cuts, and each one has to land on the line, because a cut that wanders even a quarter inch shows up as a flat spot in a curve that should be smooth.
It is worth saying plainly that this is slow, unglamorous, and almost entirely invisible in the finished product — which is exactly why it is the first thing sacrificed in a cheap bid. A crew in a hurry will cut a curve as a series of short straight chords, and from ten feet away on the day it is finished you might not notice. From the kitchen window over the following decade, you will.
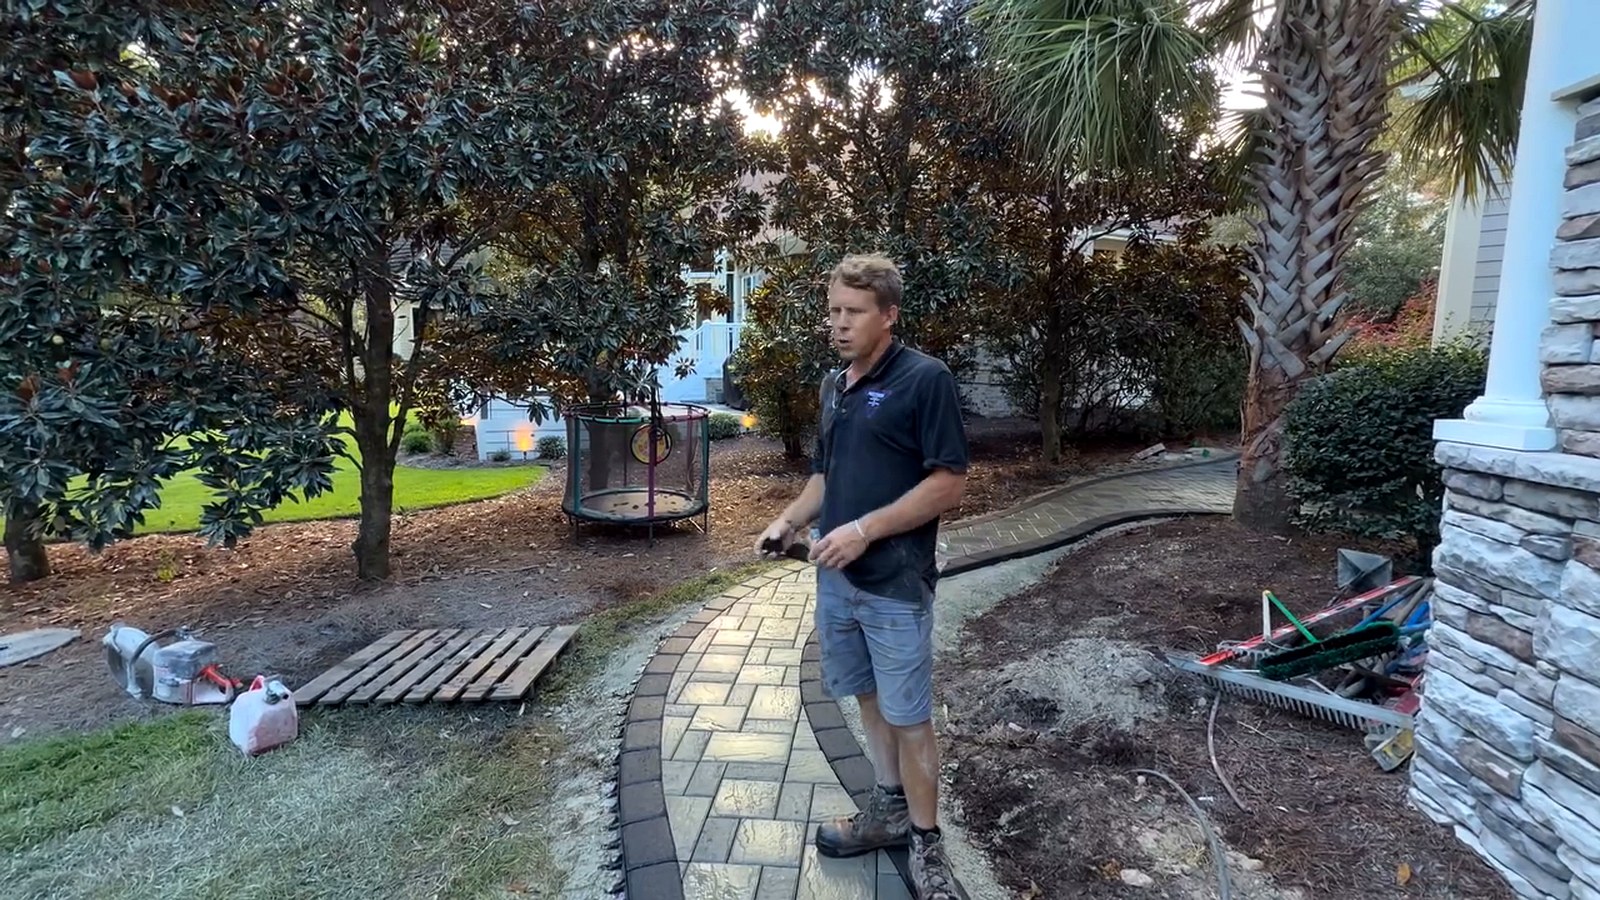
Then comes the border. The soldier course — the row of pavers laid end to end along both edges, perpendicular to the field — is what turns all that cutting into a finished line. It covers the cut ends, gives the eye a single continuous stroke to follow around every bend, and frames the walkway the way a mat frames a photograph. In the last clip in the video, with the border on and the walkway cut in, the curve finally reads as one confident sweep rather than a collection of individual decisions. That is the moment the work stops looking like construction and starts looking like landscape.
What Holds a Curve in Place for Twenty Years
A straight edge in a paver walkway is largely held by its own geometry. A curve is not, and understanding why explains most of the curved walkways you have seen that have gone bad.
Every paver in a walkway is under pressure from its neighbours, and that pressure pushes outward against the edges. Along a straight run the restraint resists it easily, because the force is perpendicular to a rigid line. On a bend the geometry works against you — the restraint is being asked to hold a shape it would rather not hold, and it is trying continuously to relax into something straighter. The tighter the radius, the harder it pulls.
The answer is not complicated, but it does cost money and time: the restraint gets spiked far more frequently through the curves than along the straights, and considerably more frequently again on the tightest bends. You can see the spikes closely spaced along the black restraint in the photographs below. It is one of the few places in hardscaping where the correct approach is simply to use more fasteners than seem necessary, and a crew that spikes a curve at the same interval as a straight run has left a problem in your yard that will take four or five seasons to surface.
When it does surface, it shows up first as the outer border pavers easing outward on the bends, then as joints opening along the outside of the curve, then as the line going soft. By then the fix is no longer a fix — it means lifting the border, re-setting the restraint properly and re-laying, which costs multiples of what doing it correctly would have cost in the first place. There is more on how base, edges and drainage decide the lifespan of any paver surface in our article on preventing water damage around patios and walkways, and in Matt’s visit back to a paver patio he installed five years earlier.
Curves Around Things That Won’t Move
Not every curve in a project is there for the look of it. Some of them exist because something in the yard is not negotiable, and those are often the fiddliest cuts on the whole job.
On this property the crew built a low stone bar specifically to conceal the gas lines running to the outdoor kitchen, and the paver field then had to arrive at it and stop cleanly on every side. As Matt says in the first clip, we did do a lot of perimeter cuts around this bar we added to hide the gas lines, and there are perimeter cuts around the kitchen, which is a little time consuming. That is a contractor’s way of saying it ate a day.
Utilities are the usual culprit. Gas lines, irrigation, low voltage lighting runs and downspout extensions all have to be located, protected and either routed around or concealed before any paving happens over them, and a hardscape built on top of a utility nobody mapped is a hardscape that will be taken apart later. Building a feature that hides a line while adding something usable — a bar, a seat wall, a raised bed — is generally a better outcome than burying it and hoping, because it turns an obstacle into part of the design.
Trees are the other one, and on coastal lots they are usually the more valuable thing in the yard. Curving a walkway to stay outside a mature root zone protects a tree that took thirty years to get that way, and it protects the walkway too, since roots will eventually lift anything laid across them. That is one curve nobody should ever value-engineer out of a plan.
Photos From the Walkway
The two images below show the curve mid-build, with the edge restraint following the marked line and the field laid long, waiting to be cut. This is the stage where a curve is decided.
What a Curve Actually Costs You
It would be dishonest to write all of the above without answering the question every homeowner is quietly holding, which is whether curves are going to cost more. They are, and it is worth being clear about where the money goes so you can decide whether you want to spend it.
The materials barely change. A curved walkway of a given length and width uses very nearly the same number of pavers as a straight one, with a modest allowance for waste from cutting. The base is the same depth, the bedding sand is the same depth, and the restraint is the same product. Nobody is charging you more for stone.
What changes is labour, in three places. The layout takes real time, because the line gets walked, adjusted and checked from several vantage points before it gets marked. The cutting takes considerably more time, because both edges are cut rather than just the two ends. And the restraint takes more time and more fasteners, because a curve has to be held far more firmly than a straight line.
Set against that, here is the case for spending it. A walkway is a thing you will look at every single day for as long as you own the house, and the difference between one that was thought about and one that was not is visible from the first day to the last. It is also one of the first things anybody sees when they arrive, which matters both for how you feel about your own home and, if you ever sell it, for what a buyer thinks in the first ten seconds. Of everything in a hardscape budget, the money spent on getting a line right is some of the hardest working.
If you would like to see how this walkway fits into the rest of the job — the 420 square foot patio it flares off, and the fire pit circle at the other end of the property — the full project write-up is here: a 420 sq ft patio, an 80-foot walkway and a fire pit circle in Ocean Ridge Plantation. For walkways more generally, including side yards and narrow runs, see paver walkways and side-yard paths.
The Last Day Is the One Nobody Films
In the final clip Matt runs through what is left once the walkway is cut in and laid, and it is a useful list because it is the part of a hardscape project that homeowners consistently underestimate: polymeric sand in the joints, clean up, dirt, sod, new pine needles, mulch, all that.
Polymeric sand is the one with real consequences. It gets swept into the joints and then activated with water, and it binds into something that resists washing out and discourages weeds and ants from setting up in the joints. Ordinary sand does none of that, and on the coast, where heavy rain is a monthly event rather than an annual one, the difference shows up within a season. It is also the step that finally locks the field, and it cannot be rushed or done in the rain, which is why it so often gets its own morning at the end of a job.
Everything after that is the part that decides whether the project reads as finished. Grading the disturbed soil back to the new edges, laying sod where the machine ran, replacing the pine straw and mulch in the beds the crew worked through, and hauling out everything that came in. A beautifully built walkway sitting in a yard full of scars and ruts does not look like a beautifully built walkway. It looks like a construction site with a nice path in it, and the homeowner will remember the mess longer than they remember the craftsmanship.
Matt’s way of describing the end of this particular job was that the crew would come back in the morning, put the final touches on it, and give this couple the backyard of their dreams. That is a slightly sentimental line for a man standing in a yard at dusk covered in paver dust, but it is also an accurate description of the job. Nobody hires a hardscape contractor because they want pavers. They hire one because they want to like being in their own backyard.
Frequently Asked Questions
Materials are almost identical — the same pavers, base and bedding sand, plus a modest allowance for cutting waste. The additional cost is labour, and it lands in three places: laying out and checking the line before anything is marked, cutting both edges rather than just the two ends, and spiking the edge restraint far more frequently through the bends. How much that adds depends on the length of the run and how many turns are in it, which is why a curved walkway is always quoted on the specific design rather than by the square foot.
With something flexible laid on the ground — a garden hose, flexible pipe or rope — moved and re-moved until the line looks right. The important part is checking it from every angle people will genuinely see it from: the back door, the driveway, the street and whichever window the homeowner uses most. A line that only works from one vantage point is the wrong line. Once it reads correctly from all of them it gets marked with paint, and from that point everything downstream follows the paint.
By measuring the offset perpendicular to the first line at frequent intervals, marking those points, and fairing a smooth line through them. An offset curve is not the same curve shifted sideways — the inside of a bend has a tighter radius and the outside a looser one — so setting the second edge purely by eye makes the path pinch on some bends and widen on others. Most people cannot explain why such a walkway looks wrong, but they can see that it does.
Only if the edge restraint was under-spiked. A curve puts constant outward pressure on its restraint and is permanently trying to relax into a straighter line, so through the bends the restraint needs fasteners at much closer intervals than along a straight run, and closer again on tight radii. Done properly the line holds indefinitely. Done at straight-run spacing, the outer border eases outward and the joints open along the outside of each bend, usually within four or five seasons.
A soldier course is the row of pavers laid end to end along the edges, running perpendicular to the field. On a curved walkway it does two jobs at once. Visually it covers the cut ends of the field and gives the eye a single continuous line to follow around every bend, which is what makes a curve read as deliberate. Structurally it works with the restraint to keep the field from spreading. On a curve it is not really optional — without it you are looking at several hundred individual cut ends.
Yes, and it usually should, but that junction needs planning rather than improvising. The path has to arrive square to the landing or driveway so people are not turning and changing elevation at the same moment, the finished heights have to match so there is no lip, and the water has to keep moving so the junction does not become a dam in heavy rain. Frequently that means adding one more curve upstream so the turn is complete before the transition begins.
For a main path that people will use daily and occasionally walk two abreast, somewhere around four feet is comfortable, and widening the mouth where it meets a patio makes that junction read properly. Secondary and side-yard paths can work at three feet. A curved path can feel slightly narrower than a straight one of the same width because you cannot see around the bend, so if you are choosing between two widths on a curved run, the wider one is usually the one you will be glad of.
Routinely, and on established coastal properties it is often the reason a path curves in the first place. Gas, irrigation, low voltage lighting and downspout runs get located and either routed around or concealed before anything is paved over them — on this project we built a low stone bar specifically to hide the gas lines feeding the outdoor kitchen. Mature trees get a wide berth, both to protect the tree and because roots will eventually lift anything laid across them.
Ready to Improve Your Outdoor Space?
If there’s a path in your yard that ought to curve, or a patio, fire pit, outdoor kitchen, retaining wall or drainage problem you’ve been putting off, call Matt Jones and walk it through with him. He’ll tell you honestly what the yard needs and what it takes to build it right the first time.
Precision Hardscape & Construction LLC
Serving Little River, Longs, North Myrtle Beach and Myrtle Beach, SC
and Calabash, Sunset Beach, Ocean Isle Beach, Shallotte and Ash, NC