
There’s a house in Ocean Ridge Plantation, just outside Ocean Isle Beach, that had a nice stone outdoor kitchen sitting on a plain concrete pad. Good bones. But the concrete was the only thing tying the whole back of the house together, and it wasn’t doing the house any favors.
So Matt Jones and the Precision crew went to work on three pieces at once: a 420 square foot paver patio, an 80-foot walkway with real curves in it running all the way out to the driveway, and a 12-foot diameter fire pit circle out toward the golf course. This article walks through how a job like that actually gets built.
Matt walks the Ocean Ridge Plantation job site — patio, walkway and fire pit area all going in at once.
What’s In This Article
- What Matt Walks You Through on Site
- Why This Job Is Really Three Jobs
- Screeding the Bedding Sand: The Step That Decides Everything
- Laying 420 Square Feet Around an Existing Concrete Pad
- Running Pavers Tight to a Stone Outdoor Kitchen
- An 80-Foot Walkway With Real Curves
- The 12-Foot Fire Pit Circle
- Drainage: What Coastal Sand Does to a Patio
- Behind the Scenes: Stacking and Staging Pavers
- Photos From the Job Site
- Mistakes That Cost Homeowners the Most
- Frequently Asked Questions
What Matt Walks You Through on Site
The video at the top of this page is about thirty seconds of Matt standing in the middle of the job, pointing at the three things that are happening at once. It’s worth watching before you read the rest, because it gives you the scale of the thing better than any description can.
In his words: “We’re on site today in Ocean Ridge Plantation. We’re doing a real big paver project over here. We’ve got about a 420 square foot patio that Tony’s screeding off right now. Down here is about an 80-foot walkway that we’re going to be doing — it’s got a lot of curves in it — and it’s going to tie in to the top of their driveway at the front of the property. And right here we’ve got a 12-foot diameter fire pit area that we’re installing as well.”
That’s the whole job in four sentences. What it doesn’t tell you is that those three elements are being built to different rules. A patio that butts up against a house has to shed water away from the foundation. A walkway that curves has to be cut and laid so the curve reads as intentional rather than wobbly. A fire pit circle out in an open pine area has to hold its round shape for decades with nothing but a soldier course and edge restraint keeping it honest.
Homeowners around Ocean Isle Beach, Sunset Beach and Calabash ask us all the time why one contractor quotes a patio at one number and another quotes it at twice that. Most of the difference is in the parts of the job you can’t see once the pavers are down. That’s what this article is about.
Why This Job Is Really Three Jobs
On paper this is one contract. In practice it’s three separate builds that happen to share a driveway and a dumpster.
The 420 sq ft patio
Sits against the back of the house, wraps around a stone outdoor kitchen, and ties into existing concrete. Everything here is about elevation control and pitching water away from the foundation.
The 80-foot curved walkway
Runs from the back of the property out to the top of the driveway. Long, narrow, and full of sweeping curves — which means layout, string lines and a lot of saw work.
The 12-foot fire pit circle
A free-standing round pad out in the pines with a golf course view. No house to reference off of, so the circle has to be set from a center point and held by a ring of edge restraint.
Splitting a project like this into three builds matters for the homeowner too, because it changes how the yard gets used during construction. The patio area goes out of service first. The walkway goes in after, so there’s still a path to the driveway while the patio settles. The fire pit circle — being off on its own — can be built in parallel whenever a crew has an open afternoon.
It also means three different base builds. A patio carrying furniture, a grill island and foot traffic gets a different base depth than a walkway carrying two people side by side. Building all three to the heaviest spec would waste the homeowner’s money; building all three to the lightest spec would put the patio in trouble inside of five years. Knowing where that line sits is most of what you’re paying a hardscape contractor for.
Screeding the Bedding Sand: The Step That Decides Everything
When Matt points the camera and says Tony’s screeding off the patio, he’s describing the single most consequential half hour of the whole installation.
Screeding is the process of pulling a straight edge across a thin layer of bedding sand riding on top of the compacted base, so that the sand ends up at a perfectly uniform depth — usually about an inch. Two pieces of pipe or screed rail get set into the sand at the finished elevation, a straight board gets dragged across them, and the excess sand peels off. Pull the rails, fill the grooves, and you’ve got a dead-flat surface that follows whatever pitch you built into the base underneath.
Here’s why it matters so much. Pavers don’t float. Every high spot and low spot in that sand bed shows up in the finished surface, and it shows up permanently, because once the field is laid and compacted the sand locks. A patio screeded well looks like a single continuous plane from across the yard. A patio screeded badly looks fine on day one and reveals itself the first time it rains, when water pools in three places that weren’t there in anyone’s plan.
The second thing screeding controls is pitch. A patio against a house should fall away from the foundation at roughly an eighth to a quarter inch per foot. Across a 20-foot patio that’s a drop of two and a half to five inches from the house to the far edge — enough to move water off, gentle enough that nobody notices they’re standing on a slope or that a table wobbles. That pitch is built into the compacted base and then carried faithfully by the screed. Get it wrong and you’ve built a shallow bathtub against somebody’s foundation.
And here’s the part homeowners rarely hear: you cannot fix bad screeding by adding sand under a low paver later. Once the field is set, the joints are filled and the plate compactor has run, the surface is a system. Correcting it means pulling pavers, re-screeding and re-laying. That’s why our crews spend real time on this step while the patio still looks like a sandbox.
Laying 420 Square Feet Around an Existing Concrete Pad
This property already had concrete behind the house. That’s typical for homes in Ocean Ridge Plantation and across Brunswick County — builders pour a functional slab, and years later the homeowner decides they want something that actually looks like an outdoor living space.
You’ve got two honest options at that point. Tear the concrete out, or build off of it. Tearing out is loud, expensive, and produces a dumpster full of rubble that somebody has to pay to haul. Building off of it — laying the paver field around and up to the existing slab, or overlaying it entirely — keeps the money in the visible part of the project.
The catch is that an overlay or a tie-in only works if the concrete underneath is sound. Before a single paver goes down we’re looking at:
- Cracking. Hairline map cracking is cosmetic. A crack that’s stepped — one side sitting higher than the other — means the slab is moving, and anything laid on top of it will move too.
- Pitch. Old slabs sometimes pitch back toward the house. If the existing concrete sends water at the foundation, the new work has to correct it, not inherit it.
- Elevation against the house. Adding a paver system on top of a slab raises the finished surface by several inches. That has to clear door thresholds, siding and weep holes — or the transition has to be handled with a step.
- Edges. Wherever new pavers meet old concrete, that seam needs an edge detail that holds the field tight, or the outside courses will creep over time.
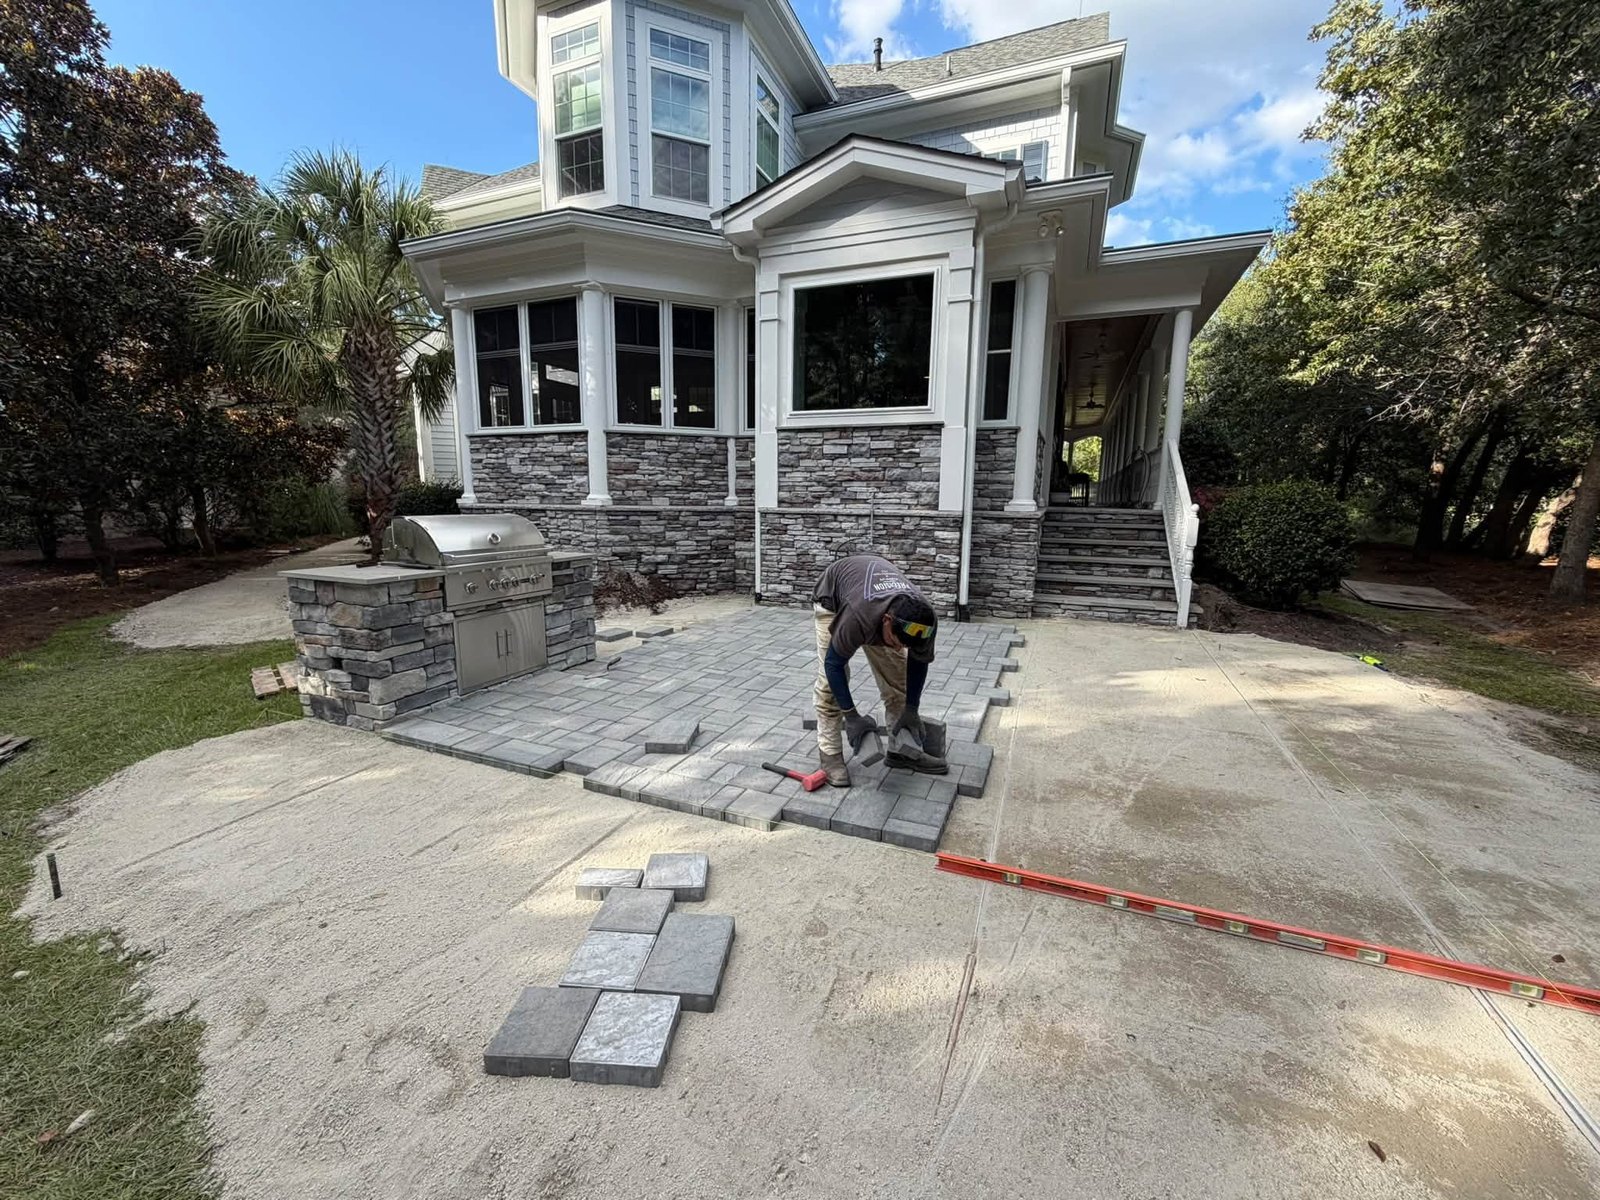
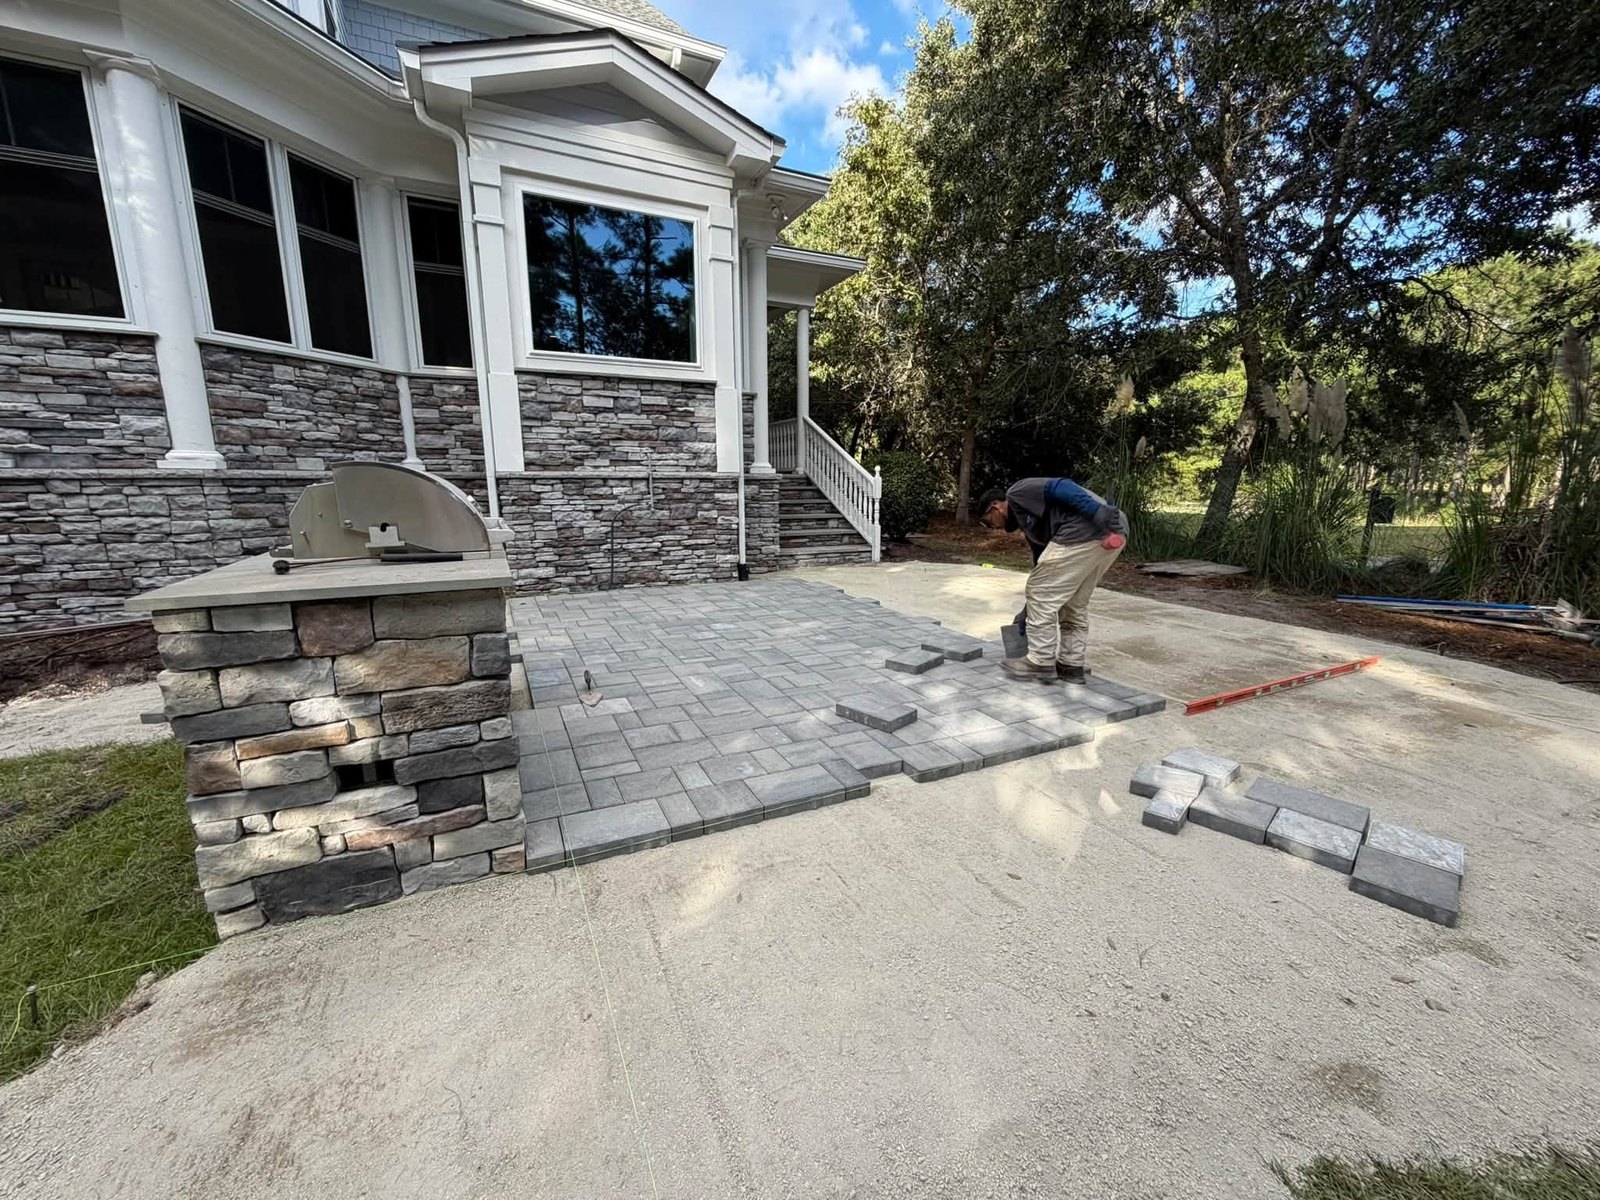
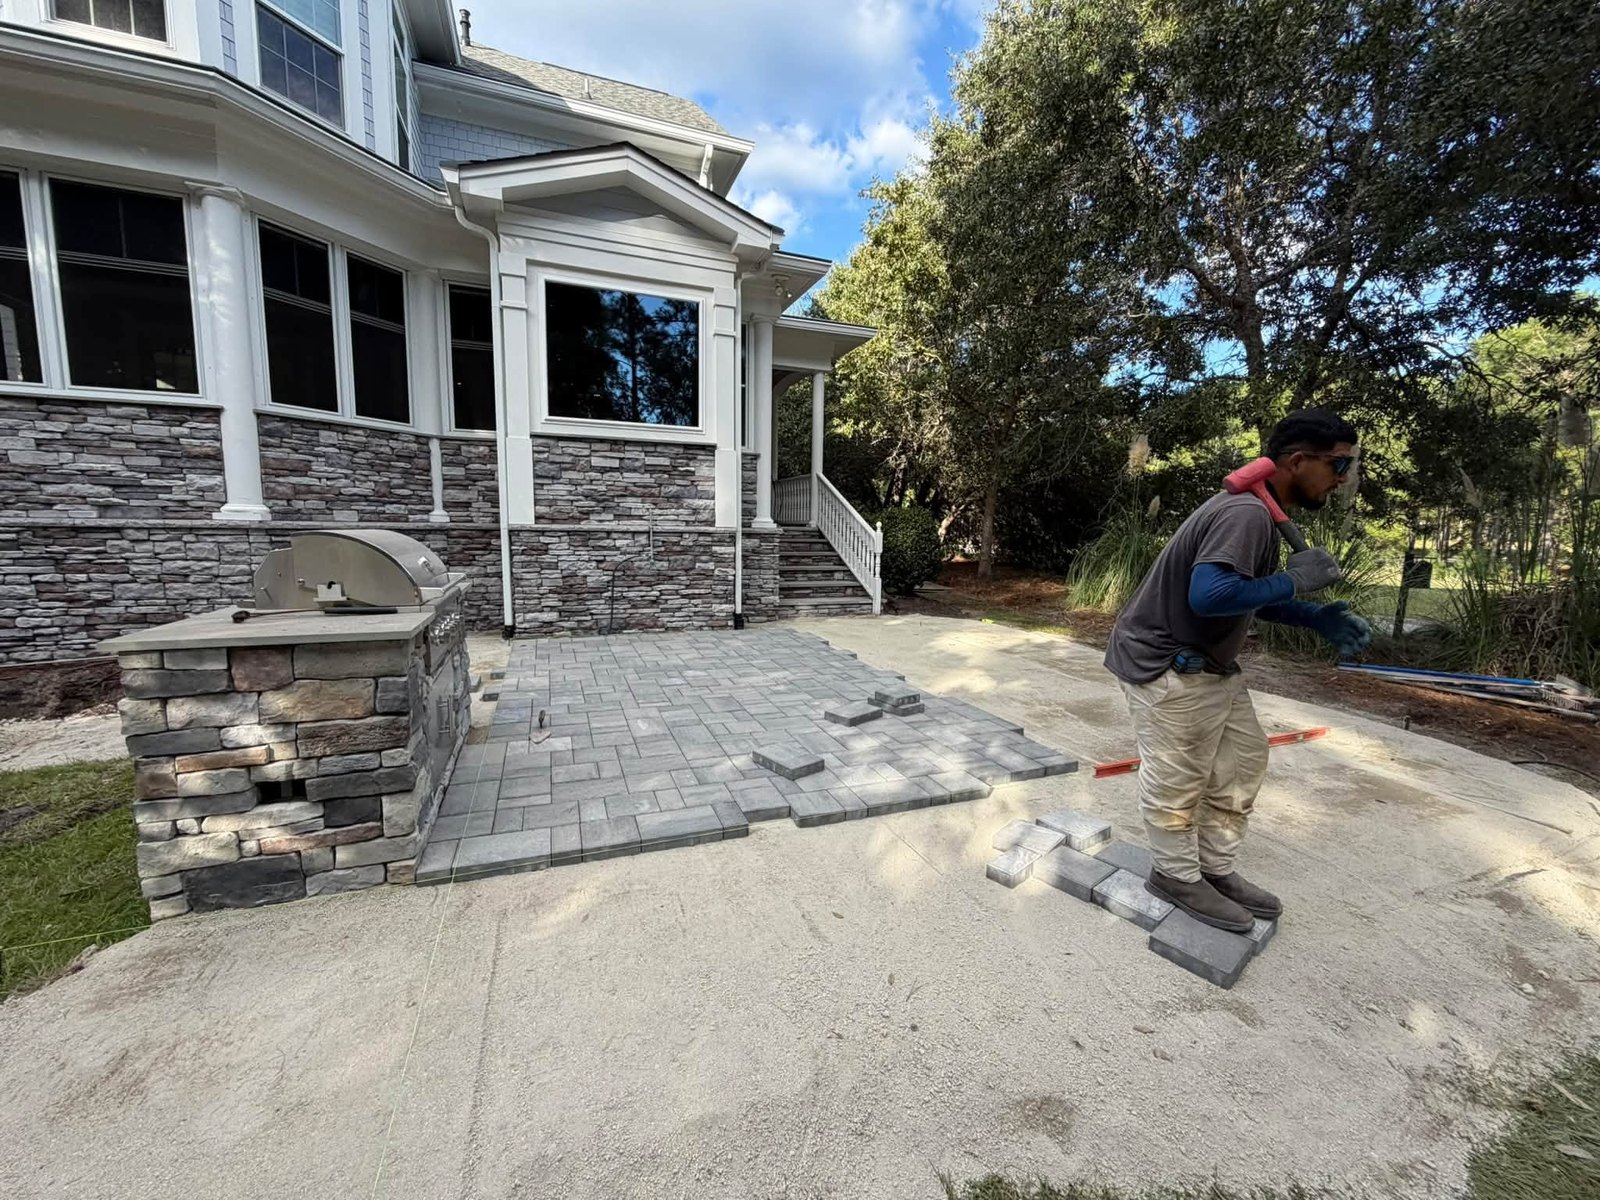
In the photos further down you can see the field growing out from the house across the old pad, with the soldier course — the row of pavers laid perpendicular along the outside edge — framing it and locking everything in. That soldier course isn’t decorative. It’s what keeps the field pavers from spreading sideways under load. If you’ve ever seen a paver patio with joints that have opened up into gaps you could lose a key in, you’re looking at a patio that either never got a proper edge or lost it.
We wrote more about this approach in our piece on paver overlays and staircases over existing concrete, and if you’re still deciding between materials, our comparison of plain concrete patios versus pavers lays out the trade-offs honestly.
Running Pavers Tight to a Stone Outdoor Kitchen
The stone grill island on this property was already built and already beautiful — stacked stone veneer, a concrete cap, a built-in gas grill. Which means the paver field had to arrive at it and stop cleanly, with no gaps, no slivers, and no awkward triangles of cut paver trying to fill a corner.
Laying into a fixed object is harder than laying into open air, and the reason is simple: you don’t get to adjust the target. An open edge can shift an inch and nobody will ever know. A stone island is exactly where it is. So the layout has to be planned backwards from it.
What that means in practice is establishing the starting line — usually the straightest, most visible edge, often the house — and then running string lines that predict where each course will land by the time it reaches the island. If the math says the last course before the island lands as a one-inch sliver, you adjust the whole field before you lay the first paver, not after. Slivers are weak, they pop out, and they look like an accident.
The cuts themselves get made on a wet saw, and a good crew makes them a hair tight rather than a hair loose. A cut that’s slightly tight can be dressed. A cut that’s loose leaves a joint that jointing sand will wash out of every heavy rain — and on the coast, heavy rain is not a rare event.
One more thing worth saying about outdoor kitchens in this climate: the pavers around a grill island take more abuse than the rest of the patio. Grease, spilled drinks, dropped cast iron, and the constant traffic of people standing in one spot. That’s an argument for a quality paver with color all the way through rather than a thin colored face, and for sealing the field around the island even if the homeowner skips sealing elsewhere. If you’re planning a cooking area, our article on outdoor kitchens that stand up to the Carolina climate goes deeper on materials and layout.
An 80-Foot Walkway With Real Curves
Eighty feet is a long walkway. And Matt makes a point of saying it’s got a lot of curves in it, because that one detail changes the labor on the whole run.
A straight paver walkway is efficient work. You set your edges, run your field, cut two edges, done. A curved walkway means every single paver along both outside edges gets cut, and each cut is a different angle from the one before it. On an 80-foot run with sweeping curves, that’s potentially a couple hundred individual cuts, each one made to a line that has to flow smoothly into its neighbors.
So why do it? Because curves are what make a walkway look like it belongs to the property instead of being stapled onto it. A straight concrete path from point A to point B reads as utility. A path that bends around a planting bed, follows the natural fall of the yard and reveals the front of the house as you come around it reads as design. On a lot like this one — mature landscaping, pine straw beds, a golf course beyond — a straight line would have looked wrong.
The layout process for curves is old-fashioned and physical. You lay out a garden hose or a length of flexible pipe and walk it until the curve looks right from the angles people will actually see it from — from the back door, from the driveway, from the street. Then you mark it with paint, and that paint line becomes gospel. Marking a curve on a plan and marking it on the ground are two very different exercises, and the ground always wins.
Curved walkways also demand more from the edge restraint. A straight edge restraint is held by its own rigidity. A curved one is constantly trying to straighten itself out, so it gets spiked more often — and on tight radii, considerably more often. Skimp there and the curve will slowly relax into something flatter over a few seasons, taking the outside course of pavers with it.
This one ties in at the top of the driveway, which is its own small problem: the walkway has to meet the driveway at a matched elevation, with a transition that doesn’t trip anybody and doesn’t dam water against the drive. We cover that junction in more detail in our article on paver walkways and side-yard paths, and on the driveway side, in paver driveway extensions in coastal Carolina.
We came back to this walkway once the curves were marked and cut, and put together a full walkthrough of how a curve like this is actually laid out and held in place: why a paver walkway curves, and how the curve gets built.
The 12-Foot Fire Pit Circle
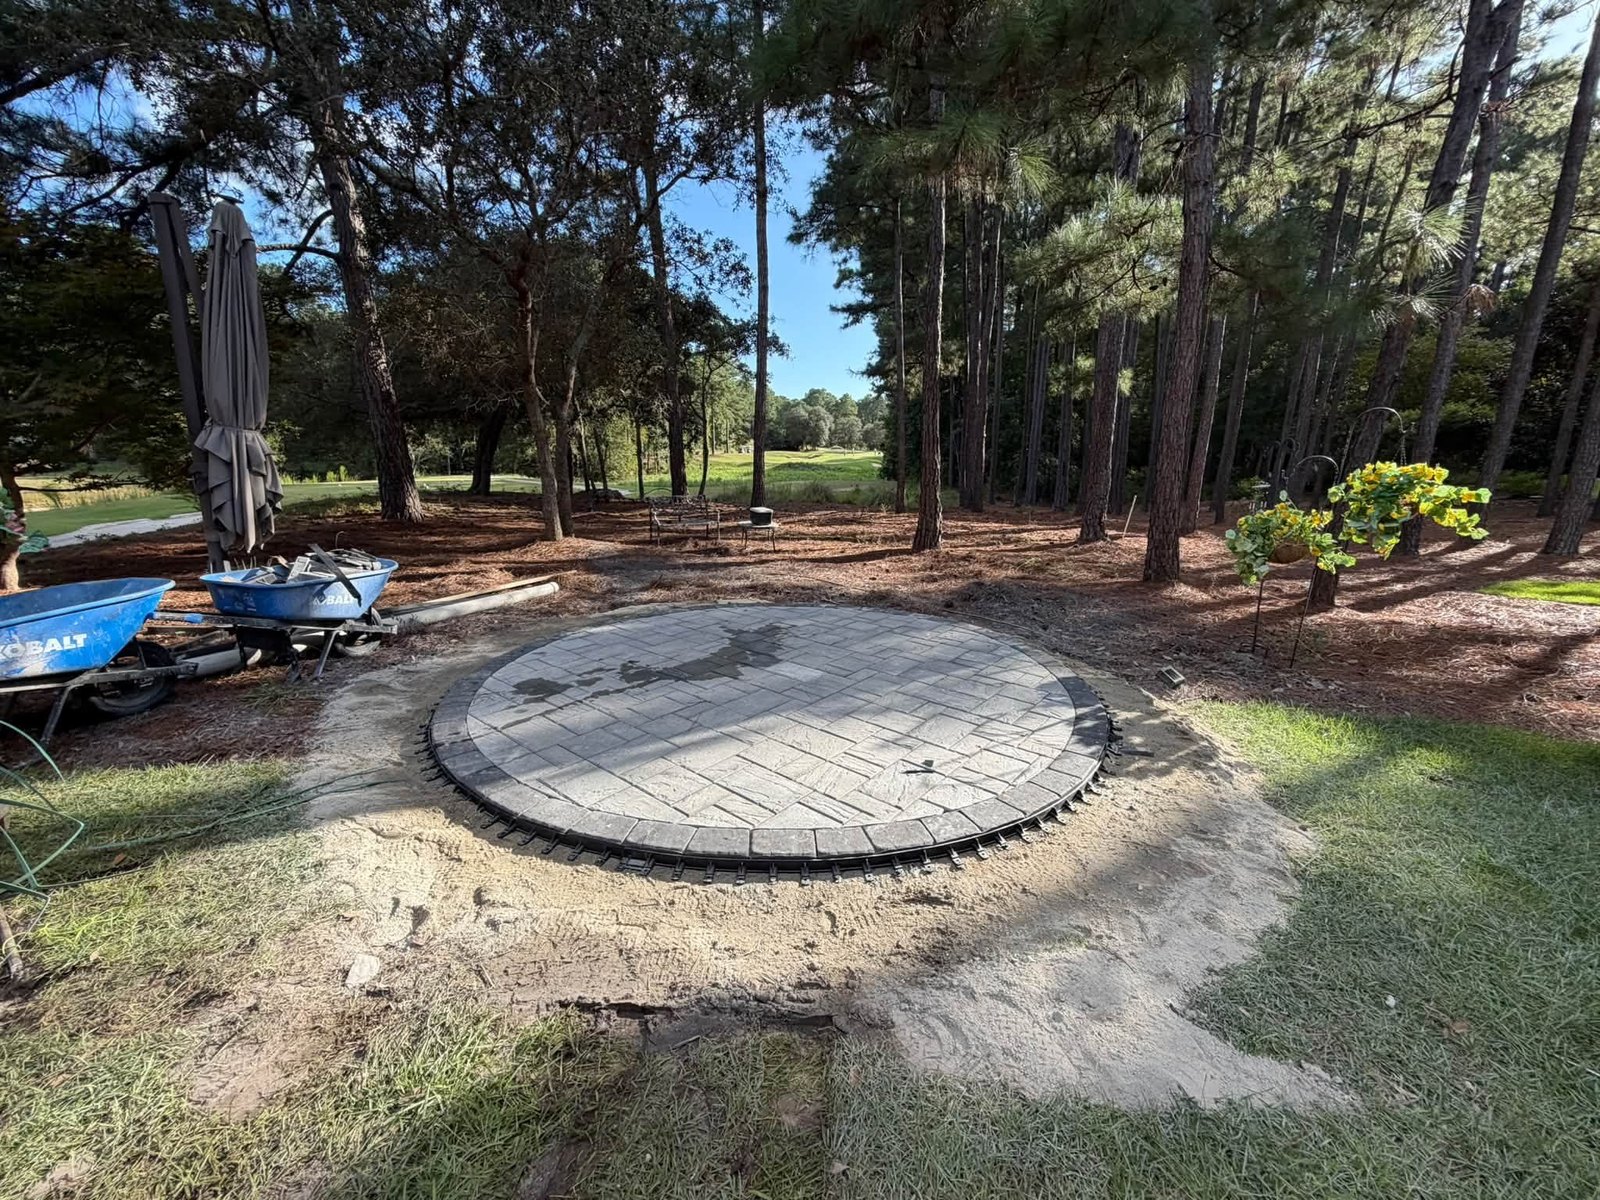
Out past the patio, in a stand of pines with the golf course opening up behind it, the crew set a 12-foot diameter circular paver pad. You can see it in the photos below — the field laid in a running pattern, ringed by a soldier course, with black edge restraint spiked around the perimeter.
Twelve feet is not an arbitrary number. It’s about the smallest circle that comfortably takes a fire feature in the middle plus chairs around it with room to walk behind them. Go down to ten and people’s backs are against the edge. Go up to sixteen and the conversation stops working — everybody’s too far apart. Twelve is the size that actually gets used.
Building a true circle is a different kind of work from building a rectangle. There’s no square corner to reference, so the whole thing is laid out from a center stake and a string, scribing the radius the way you’d draw a circle with a compass. The field pavers get laid in a normal pattern and then the entire perimeter gets cut to the arc — which, like the walkway, means a long series of individually angled cuts. The soldier course that rings it hides those cuts and gives the circle a clean, deliberate outline.
Then there’s the question of what the pad has to survive. A fire pit area gets heat, embers and spilled coals. Concrete pavers handle that far better than wood decking or a stained concrete slab, and if one ever does spall or discolor, a single paver lifts out and gets replaced in fifteen minutes. That repairability is one of the quiet arguments for pavers that doesn’t come up in sales conversations often enough.
Location matters too. This pad sits out in an open pine area — well clear of the house, clear of overhanging limbs, and positioned so the seating faces the view rather than the neighbor’s fence. In coastal neighborhoods with pine straw beds, keeping a generous clear radius around a fire feature isn’t just good manners, it’s basic fire safety. Our guide to outdoor fireplaces and fire pits in coastal Carolina covers clearances, gas versus wood, and the seating-wall options that turn a circle like this into a full gathering space.
Drainage: What Coastal Sand Does to a Patio
Everything above this point is craftsmanship. This section is the part that determines whether the job is still flat in fifteen years.
Soil from Ocean Isle Beach down through Sunset Beach, Calabash, Little River and Longs is sandy, and sand behaves in two contradictory ways. It drains fast, which sounds like good news. But it also moves when saturated water runs through it, which is very bad news for anything sitting on top. A four-inch downpour on the coast doesn’t just soak in — it travels, and it carries fine material with it.
That’s why the base under a paver system out here isn’t optional and isn’t a place to save money. A properly built base is several inches of crushed aggregate, placed in lifts and compacted between each lift, with geotextile fabric between the native soil and the stone on sites where the subgrade is soft. The fabric is the unglamorous hero: it stops the sandy subgrade from migrating up into the stone base, which is how a base loses its structure from the bottom without anyone seeing it happen.
On top of that base, three things carry water off:
- Surface pitch. The patio is built to fall away from the house, so the vast majority of rainfall simply runs off before it ever gets into the system.
- Permeable joints. Some water goes down through the jointing sand into the base, which is designed to drain rather than hold.
- A place for it to go. Pitch and permeability are useless if the water is delivered to a low spot in the lawn that already floods. Sometimes that means a French drain or a channel drain tied into the base; sometimes it just means grading the surrounding beds so the water has somewhere to run.
This is also where downspouts matter enormously. A single downspout emptying at the corner of a new patio can undermine a base in a couple of seasons, because it concentrates the runoff from a whole roof plane into one spot. Extending downspouts under or past the hardscape is cheap while the job is open and expensive later. We’ve written about that specific mistake in how to extend downspouts the right way, and about protecting hardscapes generally in preventing water damage around patios and walkways. If you’ve already got standing water in your yard, start with our drainage solutions page.
Behind the Scenes: Stacking and Staging Pavers
Matt made a point of mentioning that alongside the visible progress, the crew got a lot done behind the scenes getting pavers down, stacked and ready to lay. That sounds like housekeeping. It isn’t.
A 420 square foot patio plus an 80-foot walkway plus a 12-foot circle is somewhere in the neighborhood of a dozen pallets of pavers, and pavers are heavy. Where those pallets sit on the property determines how far every single paver has to travel by hand or by wheelbarrow. Stage them badly and you’ve added hours of pure carrying to the job — hours the homeowner is paying for that produce nothing.
Staging also protects the property. Pallets dropped on a lawn in August will kill the grass underneath within days. Pallets dropped on a driveway can stain or crack it. A machine tracking across a saturated yard leaves ruts that take a season to recover. Part of what a crew does on day one is figure out where material can sit, where the machine can travel, and which route protects the landscaping the homeowner already paid for.
There’s a quality dimension too. Pavers are manufactured in batches, and batches vary slightly in color. The professional habit is to pull from three pallets at once, mixing as you lay, so that any batch variation is distributed randomly across the field instead of showing up as a visible stripe where one pallet ran out and the next began. That only works if the pallets are staged close enough together to pull from simultaneously. It’s a small thing that you’d never notice done right and can never un-see done wrong.
So when a contractor tells you the crew spent a day “getting set up,” that’s not a slow day. On a job this size it’s the day that makes the rest of the days fast.
Photos From the Job Site
A few shots from the Ocean Ridge Plantation job while the field was going down.
Mistakes That Cost Homeowners the Most
We get called out to fix other people’s paver work regularly, in Little River, Shallotte, North Myrtle Beach and everywhere in between. The failures repeat themselves. Here’s what actually goes wrong.
Not enough base
By far the most common. A thin base compacts unevenly and the patio goes wavy. You can’t see the base once the job is done, which is exactly why it’s the first thing a cut-rate bid cuts.
No edge restraint, or the wrong one
Without a proper restraint spiked into the base, the outer courses migrate outward and the joints open up. On curves this happens faster.
Pitching water toward the house
Usually accidental, usually from matching the pitch of an old slab that was wrong to begin with. The result is water sitting against a foundation every time it rains.
Regular sand in the joints
Play sand washes out and grows weeds. Polymeric jointing sand binds when it’s wetted in, resists washout and keeps the joints tight — and it costs a fraction of the labor to fix the alternative.
Ignoring the downspouts
A roof drains thousands of gallons onto very few square feet. If those points aren’t managed before the hardscape goes in, they’ll undermine it after.
None of these are exotic. They’re all decisions made in the first two days of a job, by somebody who either knew what the coast does to hardscape or didn’t. When Matt revisited a paver patio he installed five years earlier, the thing that had held it flat wasn’t the pavers — it was the base and the edges nobody ever looks at.
If you want to see the range of what’s possible once the fundamentals are right, our paver patios, walkways, retaining walls, outdoor fireplaces and fire pits and outdoor kitchens pages show finished work across the coastal Carolina market.
Frequently Asked Questions
Yes, as long as the concrete is structurally sound — no stepped cracks, no sections that have settled against each other, and no pitch running back toward the house. An overlay saves the cost and mess of demolition. The two things to plan for are the added height, which has to clear door thresholds and siding, and the edge detail where the new pavers meet the old slab. If the concrete is actively moving, it has to come out; anything laid on a moving slab will move with it.
A properly built paver system will outlast a poured concrete patio in this climate, and it’s reasonable to expect decades of service. Pavers themselves don’t crack the way a slab does, because the joints between them let the whole field flex slightly with ground movement instead of fracturing. The variable isn’t the paver — it’s the base. A patio built on a compacted aggregate base with good drainage stays flat. One built on a thin base over sandy soil starts showing waves within a few years.
Twelve feet in diameter is the sweet spot for most backyards, which is exactly what we installed on this job. That gives you room for a fire feature in the center, a ring of chairs, and enough space behind the chairs for someone to walk past without asking people to move. Ten feet works if space is tight but feels cramped once it’s full. Sixteen feet and up spreads people too far apart for conversation — at that point you’re better off adding a seating wall to define the space rather than more paving.
Labor. On a straight walkway, only the two end courses need cutting. On a curved walkway, essentially every paver along both outside edges has to be cut to a unique angle so the curve flows smoothly. On an 80-foot run that can mean a couple hundred individual saw cuts. Curves also need edge restraint spiked more frequently, because a curved restraint is constantly trying to straighten itself. The payoff is a path that looks designed into the property rather than added to it.
Screeding is pulling a straight edge across the bedding sand so it sits at a perfectly uniform depth — about an inch — over the compacted base. It’s the step that determines whether the finished patio reads as one flat plane or has subtle high and low spots. It also carries the pitch that moves water away from the house. Once the field is laid, the joints are sanded and the surface is compacted, screeding errors are permanent; fixing them means pulling pavers back up.
Sealing is optional, not structural. What it does is deepen the color, make the surface easier to clean, and help resist staining — which matters most around outdoor kitchens and fire pit areas where grease and soot are in play. It also helps stabilize jointing sand. If you do seal, plan on reapplying every few years, and be aware that salt air and strong sun on the coast are hard on any coating. A well-built patio with polymeric joints performs fine unsealed.
A combined job of this size — a 420 square foot patio, an 80-foot curved walkway and a 12-foot fire pit circle — typically runs one to two weeks depending on weather and access. Excavation and base work take the largest share of that time, not the paver laying, which is the fast and visible part at the end. Heavy rain is the usual variable, since base material can’t be properly compacted when it’s saturated.
We work throughout the coastal Carolina market on both sides of the state line: Little River, Longs, North Myrtle Beach and Myrtle Beach in South Carolina, and Calabash, Sunset Beach, Ocean Isle Beach, Shallotte and Ash in North Carolina — including communities like Ocean Ridge Plantation, where this project was built. If you’re not sure whether you’re in range, call and ask.
Ready to Improve Your Outdoor Space?
If you’re thinking about a paver patio, a walkway, a fire pit area, an outdoor kitchen, a retaining wall or a drainage fix, call Matt Jones and talk it through. No pressure, no script — just a straight conversation about what your yard needs and what it takes to build it right the first time.
Precision Hardscape & Construction LLC
Serving Little River, Longs, North Myrtle Beach and Myrtle Beach, SC
and Calabash, Sunset Beach, Ocean Isle Beach, Shallotte and Ash, NC